The Battle of Trafalgar: A Map Unraveling Naval Supremacy
Related Articles: The Battle of Trafalgar: A Map Unraveling Naval Supremacy
Introduction
In this auspicious occasion, we are delighted to delve into the intriguing topic related to The Battle of Trafalgar: A Map Unraveling Naval Supremacy. Let’s weave interesting information and offer fresh perspectives to the readers.
Table of Content
The Battle of Trafalgar: A Map Unraveling Naval Supremacy
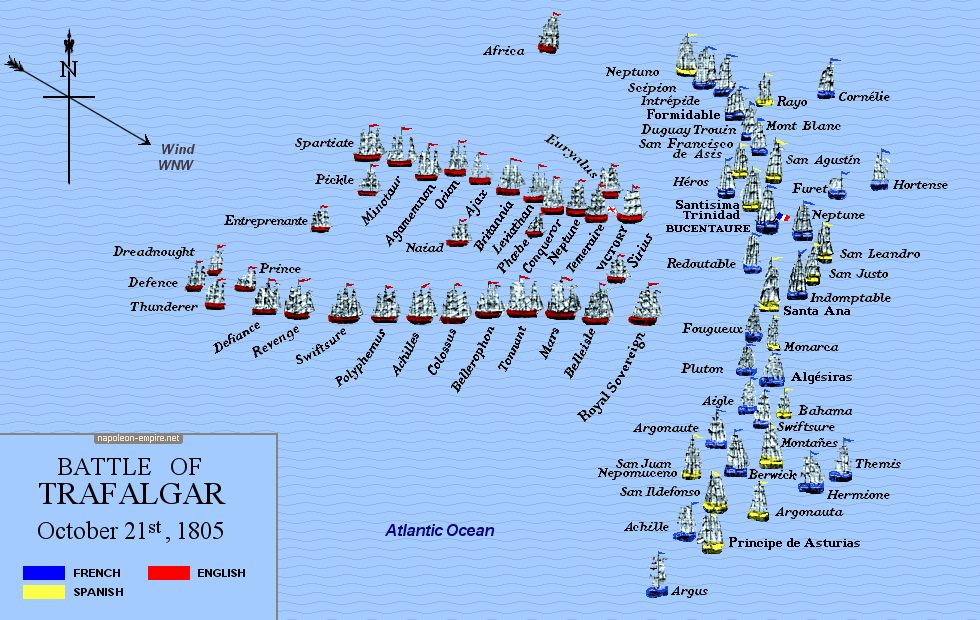
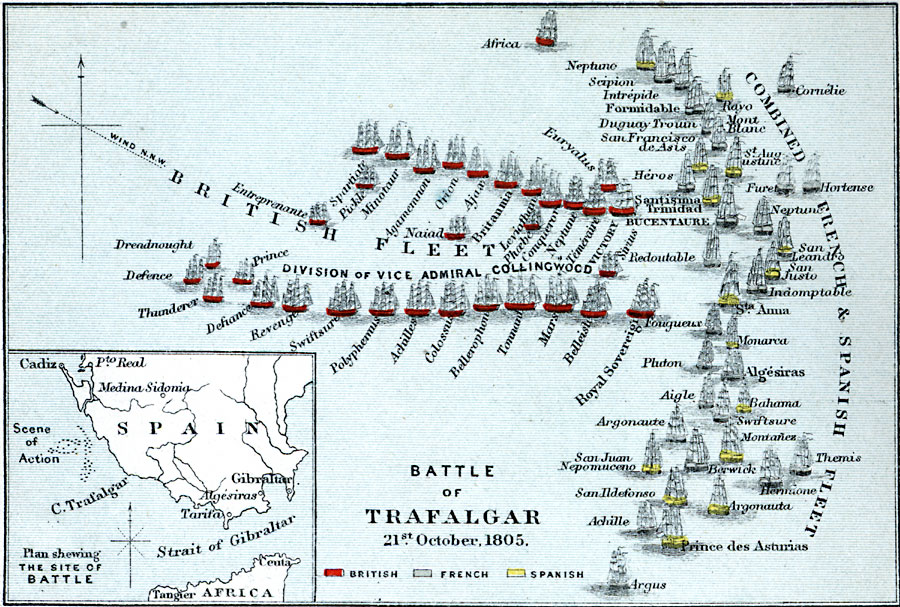
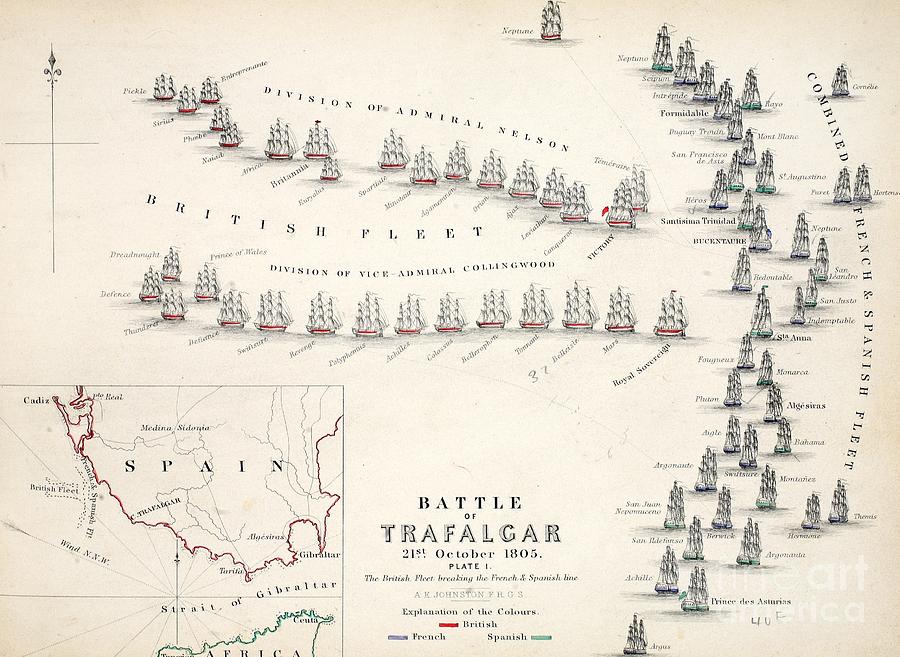
The Battle of Trafalgar, fought on October 21, 1805, stands as a pivotal moment in naval history. This clash between the British Royal Navy and the combined fleets of France and Spain, off the coast of Cape Trafalgar in southwestern Spain, cemented British naval dominance for a generation and profoundly impacted the course of the Napoleonic Wars. Understanding the battle’s unfolding requires a deep dive into the strategic landscape, the movements of the fleets, and the tactical decisions that led to the decisive victory.
The Strategic Context:
The Battle of Trafalgar was the culmination of years of naval rivalry between Great Britain and France. Napoleon Bonaparte, seeking to conquer Europe, needed to secure control of the English Channel to facilitate an invasion of England. This ambition led to the formation of a powerful Franco-Spanish fleet, aimed at challenging British dominance of the seas.
The Map as a Window:
The battle map, a visual representation of the engagement, provides an invaluable tool for understanding the strategic and tactical complexities of the encounter. It reveals the initial positioning of the fleets, the movements of individual ships, and the key moments that shaped the outcome.
The Initial Deployment:
The map reveals the initial deployment of the fleets. The combined Franco-Spanish fleet, under the command of Admiral Villeneuve, consisted of 33 ships of the line, while the British fleet, led by Admiral Nelson, comprised 27 ships of the line. The Franco-Spanish fleet formed a dense line of battle, aiming to force the British fleet into a close-quarters engagement. Nelson, however, anticipated this strategy and devised a daring plan to break the enemy line and engage them individually.
Nelson’s Tactical Genius:
The map illuminates Nelson’s innovative tactics. He divided his fleet into two columns, the "weather column" led by himself and the "lee column" commanded by Vice-Admiral Collingwood. These columns sailed perpendicular to the enemy line, aiming to cut through it and engage the enemy ships from both sides. This maneuver, known as the "Nelsonian tactic," disrupted the Franco-Spanish formation and created chaos within their ranks.
The Battle’s Unfolding:
The map traces the unfolding of the battle. The British columns, led by Nelson and Collingwood, broke through the enemy line, unleashing a devastating barrage of fire. The British ships, equipped with superior firepower and maneuverability, inflicted heavy losses on the Franco-Spanish fleet.
Key Moments:
The map highlights key moments of the battle. Nelson’s flagship, the "Victory," engaged the enemy flagship, the "Bucentaure," in a fierce duel. Collingwood’s ship, the "Royal Sovereign," also played a crucial role, breaking through the enemy line and engaging multiple enemy ships.
The Aftermath:
The map reveals the aftermath of the battle. The Franco-Spanish fleet was decimated, with 22 ships captured and 13 destroyed. The British, despite losing only four ships, suffered heavy casualties, including Nelson himself, who was fatally wounded during the battle.
The Significance of the Map:
The Battle of Trafalgar map serves as a powerful reminder of the strategic and tactical brilliance that led to a decisive victory. It underscores the importance of naval supremacy in shaping the course of history. The map also highlights the human cost of war, as it portrays the bravery and sacrifice of the sailors who fought and died in this epic encounter.
FAQs about the Battle of Trafalgar Map:
Q: What is the primary purpose of the Battle of Trafalgar map?
A: The Battle of Trafalgar map serves as a visual guide to understanding the strategic and tactical complexities of the battle. It provides a clear representation of the initial deployment of the fleets, the movements of individual ships, and the key moments that shaped the outcome.
Q: What are the key features of the Battle of Trafalgar map?
A: The map typically includes the positions of the fleets, the movements of individual ships, the key moments of the battle, and the locations of significant events, such as Nelson’s death and the capture of enemy ships.
Q: How does the Battle of Trafalgar map contribute to our understanding of the battle?
A: The map provides a visual framework for understanding the strategic and tactical decisions made by both sides, the challenges faced by the fleets, and the factors that ultimately led to the British victory.
Tips for Using the Battle of Trafalgar Map:
1. Study the Initial Deployment: Analyze the starting positions of the fleets to understand the strategic objectives and the anticipated challenges.
2. Trace the Movements of the Fleets: Observe the movements of individual ships and the overall changes in the battle formation.
3. Identify Key Moments: Focus on critical events, such as Nelson’s death, the capture of enemy ships, and the decisive maneuvers that shaped the outcome.
4. Compare and Contrast: Compare the initial deployment with the final positions of the fleets to understand the impact of the battle on the strategic landscape.
5. Analyze the Aftermath: Examine the final positions of the fleets, the number of ships captured or destroyed, and the overall impact of the battle on the course of the Napoleonic Wars.
Conclusion:
The Battle of Trafalgar map serves as a valuable tool for understanding this pivotal naval engagement. It provides a visual representation of the strategic and tactical decisions made, the movements of the fleets, and the key moments that shaped the outcome. Through the map, we can appreciate the brilliance of Nelson’s tactics, the bravery of the sailors, and the enduring impact of this battle on the course of history. The map stands as a testament to the importance of naval supremacy and the enduring legacy of this historic encounter.


Closure
Thus, we hope this article has provided valuable insights into The Battle of Trafalgar: A Map Unraveling Naval Supremacy. We appreciate your attention to our article. See you in our next article!